---
title: "Self-host LoopForge"
description: "Run Tencent LoopForge on a private exe.dev VM: SOPs for coding agents with approval gates, Docker sandboxes, and Codex and Claude Code with no API keys."
url: https://exe-staging.dev/deploy/loopforge
category: "AI agents"
updated: 2026-11-15
---
# Self-host LoopForge
Your team's coding agents follow the same SOP, and wait for your approval.
- **Software:** LoopForge
- **Source:** https://github.com/Tencent/LoopForge
- **License:** MIT
- **Time:** 15 minutes
- **Example VM name:** `my-loopforge` (yours will differ; on the VM, `hostname` prints it)
- **Machine-readable:** https://exe-staging.dev/deploy/loopforge/manifest.json
## What you get
- LoopForge 0.3.8 at your VM's private URL, behind your exe.dev login and its own accounts, with self sign-up closed.
- The first account, made by you in the browser, becomes the administrator; your password never passes through Shelley.
- LoopForge and MySQL back after a reboot.
- A nightly archive of the database, settings, and workspaces, kept two weeks, with a tested restore.
Running on the VM:
- **LoopForge 0.3.8**: ghcr.io/tencent/loopforge:0.3.8 in Docker Compose, with sign-up closed, port 8000, data in `~/loopforge/.data and the platform-data volume`
- **MySQL 8.4**: In the same Compose project, listening only on the VM, data in `the mysql-data volume`
- **Run sandboxes**: One container per SOP run, started by LoopForge through the VM's Docker
- **exe.dev LLM gateway**: GPT and Claude models for Codex and Claude Code, without API keys
How it is reached:
- https://my-loopforge.exe.xyz/ (private): LoopForge, behind your exe.dev login and a LoopForge account
- https://my-loopforge.exe.xyz/ (shared): Teammates you share the VM with and give a LoopForge account
## Deploy with Shelley
Open https://exe-staging.dev/new?prompt=Set%20up%20LoopForge%20on%20this%20VM%20by%20following%20the%20exe.dev%20recipe%20at%20https%3A%2F%2Fexe-staging.dev%2Fdeploy%2Floopforge.md%20from%20top%20to%20bottom.%0A%0AThe%20recipe%27s%20example%20VM%20name%20is%20my-loopforge.%20This%20VM%27s%20name%20is%20the%20output%20of%20%60hostname%60%3A%20use%20it%20wherever%20the%20recipe%20writes%20my-loopforge.%20Skip%20the%20step%20that%20creates%20the%20VM%3B%20you%20are%20on%20it.%0A%0AYou%20are%20done%20when%20all%20of%20these%20are%20true.%20Check%20each%20one%20yourself%3A%0A-%20LoopForge%200.3.8%20at%20your%20VM%27s%20private%20URL%2C%20behind%20your%20exe.dev%20login%20and%20its%20own%20accounts%2C%20with%20self%20sign-up%20closed.%0A-%20The%20first%20account%2C%20made%20by%20you%20in%20the%20browser%2C%20becomes%20the%20administrator%3B%20your%20password%20never%20passes%20through%20Shelley.%0A-%20LoopForge%20and%20MySQL%20back%20after%20a%20reboot.%0A-%20A%20nightly%20archive%20of%20the%20database%2C%20settings%2C%20and%20workspaces%2C%20kept%20two%20weeks%2C%20with%20a%20tested%20restore.%0A%0ARead%20the%20whole%20recipe%2C%20including%20the%20closed%20details.%20For%20initial%20setup%2C%0Afollow%20%22Install%20by%20hand%22%20first%2C%20skipping%20VM%20creation%20and%20SSH.%20Install%0Aexactly%20the%20pinned%20tag%2C%20v0.3.8.%20Don%27t%20set%20MIRROR.%0ANever%20open%20the%20LoopForge%20URL%20and%20never%20call%20%2Fapi%2Fauth%2Fregister%3A%20the%20first%0Aaccount%20becomes%20the%20administrator%2C%20and%20the%20owner%20must%20create%20it.%20Don%27t%0Aconfigure%20credentials%2C%20GitHub%2C%20projects%2C%20or%20SOPs%20yourself.%0AKeep%20the%20VM%20private.%20Never%20run%20share%20set-public%2C%20and%20never%20set%0AAGENTFLOW_ALLOW_SIGNUP%3Dtrue.%20On%20an%20existing%20VM%2C%20ask%20before%20replacing%0Aanything%20on%20port%208000.%0AVerify%3A%20%2Fapi%2Fhealth%20says%20ok%2C%20%2Fapi%2Fauth%2Fsetup%20says%20needsSetup%20true%2C%20both%0Acontainers%20have%20the%20unless-stopped%20restart%20policy%2C%20the%20image%20digest%0Amatches%2C%20and%20the%20test%20archive%20lists%20loopforge.sql%20and%20.env.%20Do%20not%0Areboot%2C%20and%20don%27t%20run%20the%20restore%20or%20update%20steps.%0AFinish%20with%20https%3A%2F%2FVM.exe.xyz%2F%20and%20tell%20the%20owner%20to%20create%20their%0Aadministrator%20account%20now%2C%20then%20follow%20%22Connect%20Codex%20and%20Claude%20Code%22.%0A%0AFinish%20with%20the%20URLs%20I%20should%20open.%0A to create a VM whose agent, Shelley, follows this recipe. From a terminal:
```sh
curl -fsSL https://exe-staging.dev/deploy/loopforge/prompt.txt | ssh exe.dev new --prompt=/dev/stdin
```
Or follow the steps below by hand.
LoopForge is Tencent's open-source workspace for a team of coding
agents. Instead of asking one agent to "fix this bug" and hoping, you
pick an SOP: planning, implementation, review, and testing, each step a
role with its own prompt, model, tools, and agent. Runs go step by
step in Docker sandboxes and stop at approval gates, where someone reads
the report and approves it or sends the work back. Every step's log,
tool calls, and artifacts stay on the run page.
Agents can be Codex, Claude Code, Tencent's CodeBuddy, and more. Here
LoopForge runs on its own exe.dev VM, private behind your exe.dev
login, and Codex and Claude Code reach GPT and Claude through exe.dev's
[LLM gateway](/docs/integrations-llm), so there are no API keys to
paste.
## Create your admin account
Open `https://my-loopforge.exe.xyz/` and sign in to exe.dev. LoopForge
asks you to **Create the administrator account** (switch the page to
English with **中 / EN** at the bottom): choose a login name and a
password. Do it before you share the VM: until the first account exists,
anyone who can open the page could take it. Everyone else gets an
account from you; sign-up is closed.
You land on the chat home. Its window is in Chinese: **新对话** is a new
chat, and the composer has pickers for the agent, model, and project.
## Connect Codex and Claude Code
Keys belong to each account, not to the server. Open **Settings** (the
gear at the bottom left), then **Personal settings**. Under **Models &
execution**, choose **Configure** next to **Codex**:
- **API key:** `implicit`. It's a placeholder: exe.dev adds the real
credentials outside the VM.
- **Base URL:** `https://llm.int.exe.xyz/openai/v1`
Click **Next**, then **保存凭证** (save). Do the same for **Claude Code**,
with `implicit` and **Base URL** `https://llm.int.exe.xyz/anthropic`.
The `/openai` and `/anthropic` paths matter: LoopForge lists each
agent's models from its Base URL, and the gateway's plain address lists
GPT models for Claude Code too.
Back on the chat home, pick **Codex** in the agent menu, a model such as
`gpt-6.1-sol`, and say hi. The reply comes back in a few seconds. In
0.3.8 the chat can't run Claude Code (see the FAQ); SOP roles can.
## Try an SOP
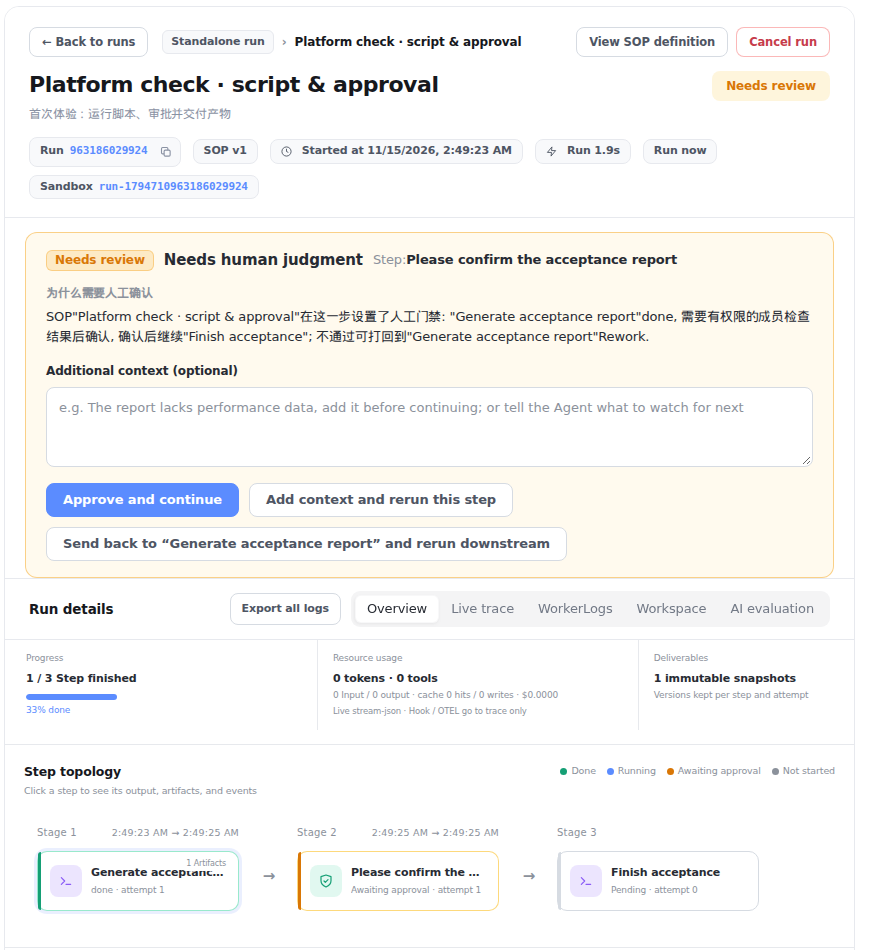
The chat home's first card, **一键体验** (one-click demo), starts a
demo SOP that needs no key: a script in a sandbox writes a report, then
the run waits for your approval.
The demo run, waiting at its approval gate.
Click **Approve and continue** and the last step runs. Real SOPs work
the same way. LoopForge ships generic backend, frontend, bug-fix, and
product SOPs under **Templates**; open their roles under **Roles** to
choose each step's agent and model, then create a requirement in a
project and pick an SOP. For code, connect GitHub first (see the FAQ).
> [!WARNING]
> **Keep this VM private.** LoopForge starts sandboxes through the VM's
> Docker socket, which is as good as root on the VM, and every account
> sees every project. Give accounts only to people you'd give a shell.
## Bring your team
On your computer, share the VM:
```bash
ssh exe.dev share add my-loopforge teammate@example.com
```
Then, in LoopForge, open **Settings → Platform admin → Accounts**, enter
a login name, click **Generate** for an initial password, and **Create
account**. Send them the login and password. Each teammate connects
their own agents in **Personal settings**; through the gateway, their
model use is billed to your exe.dev account.
## Keep your work
LoopForge keeps its data in MySQL, a Docker volume, and
`~/loopforge/.data` (run workspaces). Each night at about 3:30 UTC, a
timer dumps the database and archives it with the volume, `.data`, and
the settings in `~/loopforge/.env` to `~/backups/loopforge`, keeping two
weeks. Copy them **off the VM** too. On your computer:
```bash
rsync -av my-loopforge.exe.xyz:backups/loopforge/ ./loopforge-backups/
```
Keep those copies private: they hold every account's model keys and
GitHub tokens.
## Setup and upkeep
No need to read on unless you're curious—or doing it yourself.
Install by hand
On your computer (pick another name if `my-loopforge` is taken):
```bash
ssh exe.dev new --name=my-loopforge
ssh my-loopforge.exe.xyz
```
All remaining installation commands run **on the VM**, as `exedev`.
### Get LoopForge
Start Docker and clone the tested release:
```bash
sudo systemctl enable --now docker.service
git clone -q -c advice.detachedHead=false --branch v0.3.8 --depth 1 \
https://github.com/Tencent/LoopForge.git ~/loopforge
cd ~/loopforge
```
### Configure it
`scripts/configure.sh` writes `.env` with generated database passwords
and a session secret. LoopForge listens on port 8000, where the
[HTTPS proxy](/docs/proxy) sends the VM's address. The two extra lines
close sign-up after the first account and mark the session cookie
HTTPS-only:
```bash
AGENTFLOW_HTTP_PORT=8000 LOOPFORGE_PUBLIC_URL="https://$(hostname).exe.xyz" \
bash scripts/configure.sh
printf 'AGENTFLOW_ALLOW_SIGNUP=false\nAGENTFLOW_SECURE_COOKIES=true\n' >> .env
grep -E '^(AGENTFLOW_HTTP_PORT|LOOPFORGE_PUBLIC_URL|AGENTFLOW_ALLOW_SIGNUP)=' .env
```
Expect port 8000, your VM's address, and `false`.
### Start it
`start.sh` pulls the pinned images (about 4 GB), starts MySQL and
LoopForge, and installs the starter SOPs and the demo project:
```bash
LOOPFORGE_YES=1 ./start.sh
```
It takes a few minutes and ends with `✓ LoopForge is running`.
LoopForge restarts with Docker, but its MySQL container doesn't, so add
that and recreate it:
```bash
printf 'services:\n mysql:\n restart: unless-stopped\n' > compose.override.yaml
docker compose up -d --wait mysql
docker inspect -f '{{.Name}} {{.HostConfig.RestartPolicy.Name}}' loopforge-mysql-1 loopforge-platform-1
curl -fsS --retry 10 --retry-connrefused --retry-delay 3 localhost:8000/api/health; echo
curl -fsS localhost:8000/api/auth/setup; echo
```
Expect `unless-stopped` twice, `"status":"ok"`, and
`"needsSetup":true`. Check the image is the one Tencent released:
```bash
docker image inspect --format '{{index .RepoDigests 0}}' ghcr.io/tencent/loopforge:0.3.8
```
Expect `sha256:481ecb6334a21308acb93f164f5dc74f508109d3e108089981a7ea87de095963`,
the digest in the
[v0.3.8 release notes](https://github.com/Tencent/LoopForge/releases/tag/v0.3.8).
### Set up nightly backups
The database is dumped in one transaction while LoopForge keeps running.
The script runs as root, because sandboxes leave root-owned files in
`.data`, and hands the archives to you:
```bash
sudo tee /usr/local/sbin/loopforge-backup >/dev/null <<'EOF'
#!/bin/sh
# Archive LoopForge: a database dump, the platform volume, and .data.
set -eu
cd /home/exedev/loopforge
out=/home/exedev/backups/loopforge
mkdir -p "$out" && chmod 700 "$out"
tmp=$(mktemp -d)
trap 'rm -rf "$tmp"' EXIT
docker compose exec -T mysql sh -c 'MYSQL_PWD="$MYSQL_ROOT_PASSWORD" exec mysqldump -uroot --single-transaction --routines --triggers --add-drop-database --databases loopforge' > "$tmp/loopforge.sql"
docker cp loopforge-platform-1:/data - > "$tmp/platform-data.tar"
tar -czf "$out/loopforge-$(date +%Y%m%d-%H%M).tar.gz" --exclude=.data/cli .env .data -C "$tmp" loopforge.sql platform-data.tar
find "$out" -name 'loopforge-*.tar.gz' -mtime +13 -delete
chown -R exedev:exedev /home/exedev/backups
EOF
sudo chmod 755 /usr/local/sbin/loopforge-backup
sudo tee /etc/systemd/system/loopforge-backup.service >/dev/null <<'EOF'
[Unit]
Description=LoopForge backup
Requires=docker.service
After=docker.service
[Service]
Type=oneshot
UMask=0077
ExecStart=/usr/local/sbin/loopforge-backup
EOF
sudo tee /etc/systemd/system/loopforge-backup.timer >/dev/null <<'EOF'
[Unit]
Description=Nightly LoopForge backup
[Timer]
OnCalendar=*-*-* 03:30:00
RandomizedDelaySec=30m
Persistent=true
[Install]
WantedBy=timers.target
EOF
sudo systemctl daemon-reload
sudo systemctl enable --now loopforge-backup.timer
sudo systemctl start loopforge-backup.service
tar -tzf "$(ls -t ~/backups/loopforge/loopforge-*.tar.gz | head -1)" | grep -cx -e loopforge.sql -e .env
systemctl list-timers loopforge-backup.timer
```
Expect `2` and a scheduled next run. Downloaded agent CLIs in
`.data/cli` are left out; LoopForge fetches them again.
### Create your account
Open `https://.exe.xyz/` and carry on from
[Create your admin account](#create-your-admin-account).
Back up and restore
On the VM, take a fresh archive now:
```bash
sudo systemctl start loopforge-backup.service
ls -t ~/backups/loopforge | head -3
```
To restore, set `BACKUP` to the archive's path. LoopForge stops for
about a minute; the database and files are replaced with the archive's:
```bash
BACKUP=~/backups/loopforge/loopforge-YYYYMMDD-HHMM.tar.gz
cd ~/loopforge
sudo rm -rf ~/restore && mkdir ~/restore &&
sudo tar -C ~/restore -xzf "$BACKUP" &&
docker compose stop platform &&
sudo cat ~/restore/loopforge.sql | docker compose exec -T mysql sh -c 'MYSQL_PWD="$MYSQL_ROOT_PASSWORD" exec mysql -uroot' &&
sudo cat ~/restore/platform-data.tar | docker cp - loopforge-platform-1:/ &&
sudo rsync -a --delete --exclude=/cli ~/restore/.data/ .data/ &&
docker compose start platform && sudo rm -rf ~/restore
```
Sign in and check your runs are there. Moving to a new VM? Install there
first, copy the archive over with `scp`, and run the same commands.
The new VM keeps its own `.env`; everyone signs in again.
Update
LoopForge releases often, several times a week lately, and each release
pins a new image in `compose.yaml`. Read the
[release notes](https://github.com/Tencent/LoopForge/releases) and skip
`-rc` prereleases. Then, on the VM, take an archive and switch to the
new tag, replacing `VERSION`:
```bash
sudo systemctl start loopforge-backup.service
cd ~/loopforge
git fetch -q --depth 1 origin tag VERSION &&
git -c advice.detachedHead=false checkout -q VERSION &&
./start.sh pull
```
`./start.sh pull` pulls the newly pinned image and restarts LoopForge.
Check the digest against the release notes as in "Start it", with the
new version, then sign in and check your runs.
LoopForge doesn't migrate data on its own. Each entry in
[CHANGELOG.md](https://github.com/Tencent/LoopForge/blob/main/CHANGELOG.md)
says whether a release needs a migration; apply any file it names, for
example:
```bash
docker compose exec -T mysql sh -c 'MYSQL_PWD="$MYSQL_PASSWORD" mysql -u loopforge loopforge' < migrations/027_cli_model_catalog.sql
```
Something stuck?
Ask Shelley, or check on the VM:
```bash
cd ~/loopforge
docker compose ps
./start.sh logs
curl -fsS localhost:8000/api/health
```
- **502 from the page?** LoopForge takes half a minute to start; reload.
Still there? Check `docker compose ps` and the log.
- **LoopForge keeps restarting after a reboot, with `lookup mysql`
errors?** MySQL didn't come back. Check `compose.override.yaml` exists
as in "Start it", then run `docker compose up -d --wait mysql`.
- **The model picker is empty, or the chat says 不支持的执行器
(unsupported executor)?** Close the message and choose the agent again;
the model list loads after the page. Still empty? Check the agent's
Base URL in **Personal settings**.
- **Claude Code lists GPT models?** Its Base URL is missing
`/anthropic`.
- **A run fails?** Open the run's **WorkerLogs** tab, and check your
[LLM integration](/docs/integrations-llm).
- **Locked out?** Another administrator can reset your password under
**Platform admin → Accounts**. Or, on the VM, set a new one for login
`NAME`:
```bash
cd ~/loopforge && read -rs -p 'New password: ' pw && echo &&
printf '%s\n' "$pw" | docker compose exec -T platform loopforge-account -user NAME -admin; unset pw
```
## Frequently asked questions
### What does it cost?
LoopForge is free and MIT-licensed. You pay for your [VM plan](https://exe.dev/pricing) and for the models your agents use through the [LLM integration](/docs/integrations-llm). Each run page shows the tokens it used.
### Why two logins?
exe.dev's login keeps out everyone you haven't shared the VM with. LoopForge has its own accounts, and each account has its own model keys and GitHub connection, so it keeps its own password. LoopForge can trust a sign-in header only from its own machine, which it isn't in Docker, so this guide doesn't connect the two.
### Do I need a CodeBuddy key?
No. Chat and SOP roles can run on Codex or Claude Code through the gateway. A few features only run on Tencent's [CodeBuddy](https://www.codebuddy.ai): **Analyze** on a new requirement, notifications, bots, and run evaluation. Add a CodeBuddy key under **Personal settings** if you want those.
### Why is the chat in Chinese?
LoopForge comes from a Chinese team. The settings and management pages switch to English with **中 / EN** at the top right; the chat window is Chinese for now. The agents answer in the language you write in.
### Can the agents work on my GitHub repositories?
Yes. In **Personal settings**, choose **GitHub** and **Connect GitHub**, then approve the PIN on GitHub. That grants LoopForge's GitHub app `repo` access for your account; a fine-grained personal access token works too, if you'd rather limit it to some repositories. Then add repositories to a project.
### Can I run Claude Code in the chat?
Not with 0.3.8 in Docker: the chat says the server hasn't installed the Claude Code CLI. Choose **Codex** in the chat. SOP roles can use Claude Code; LoopForge downloads it into the run's sandbox the first time.
### Can it run agents on my own machine?
Yes. LoopForge's personal runners connect a laptop or another server with a short-lived binding code, under **Runners**. We haven't tested them on exe.dev; runs in this guide use sandboxes on the VM.
## Related
- [Self-host Paperclip](https://exe-staging.dev/deploy/paperclip.md): Hire a team of AI agents. Give them an office that never closes.
- [Self-host OpenHands](https://exe-staging.dev/deploy/openhands.md): The OpenHands web UI and its Docker sandboxes on one VM. No API keys to paste.
- [Run Codex on a remote server](https://exe-staging.dev/deploy/codex.md): A computer for Codex. An early night for your laptop.
- [Run Claude Code on a remote server](https://exe-staging.dev/deploy/claude-code.md): A computer for Claude. A breather for your laptop.
- [Host OpenClaw](https://exe-staging.dev/deploy/openclaw.md): An AI sidekick with its own computer. Your laptop can take a nap.
- [Run Codex remote control on a server](https://exe-staging.dev/deploy/codex-remote-control.md): Codex on an always-on VM, steered from the ChatGPT app on your phone.